Bulk import your club registry
The Registry is your club's catalog of members' vehicles. When you are setting up a club, migrating from another system, or adding a season's worth of new cars, the importer lets you add (or update) many registry entries at once from a CSV spreadsheet instead of entering them one by one. You download a template built from your club's Registry Template fields, fill it in, optionally zip up photos, and upload it back. Use this when you have more than a handful of vehicles to add; for a single car, use the Add vehicle to registry path on the Registry page instead.
Before you begin
- You must be a club owner, co-owner, admin, or site manager. Only these roles see Edit registry and Add vehicle to registry on the Registry page. Members, guests, and delegated roles such as Treasurer, Organizer, or Moderator cannot open the importer. See Set up the club access control panel for how roles are assigned.
- Your club needs a Club Site with the Registry page enabled. See Inside a club website and Customize your club website.
- Configure your Registry Template fields first. On the Registry page, click Edit registry, then Registry Template. Each field you add (types: Text, Paragraph text, Single choice, Multiple choice, Dropdown) becomes a column in the import template. A club with no fields gets only the fixed columns (
Owner,Name,Description,FilePaths). Finalize the fields before you download, because changing them afterward means a new template and rework in your spreadsheet. - You will need a spreadsheet app that can save as CSV (Excel, Numbers, Google Sheets), and, if you want photos, the image files zipped with every file at the top level of the archive (zip the files, not the folder they sit in).
- Plan on 15 to 30 minutes for the first import, most of it spent filling in the spreadsheet. The upload itself finishes in seconds for small files.
Step-by-step
The whole import happens inside one dialog: download the template, upload your file, and read the results without leaving it.
Open the importer
- On your club site, open the Registry page. You should see the toolbar buttons Edit registry and Add vehicle to registry.
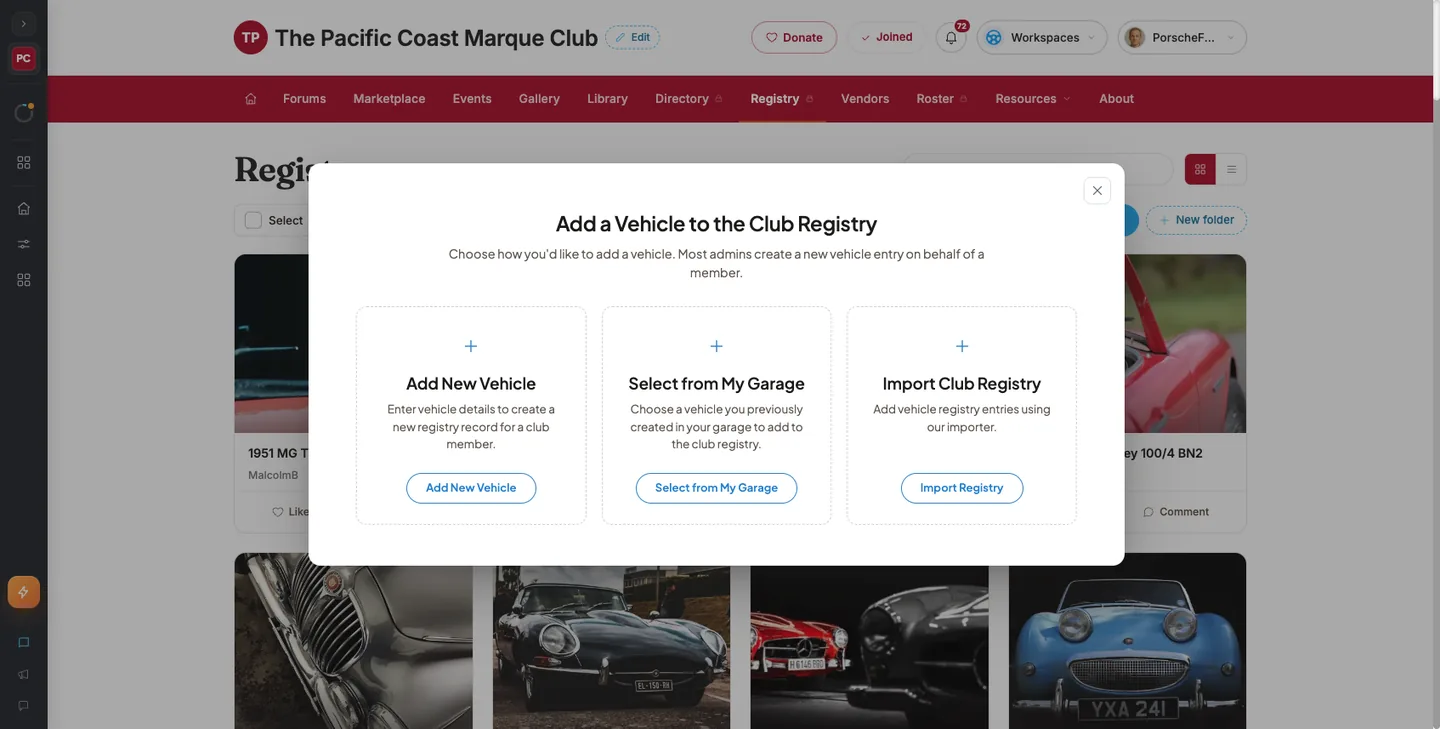
- Click Add vehicle to registry. A dialog titled Add a Vehicle to the Club Registry opens with a card titled Import Club Registry that reads Add vehicle registry entries using our importer.
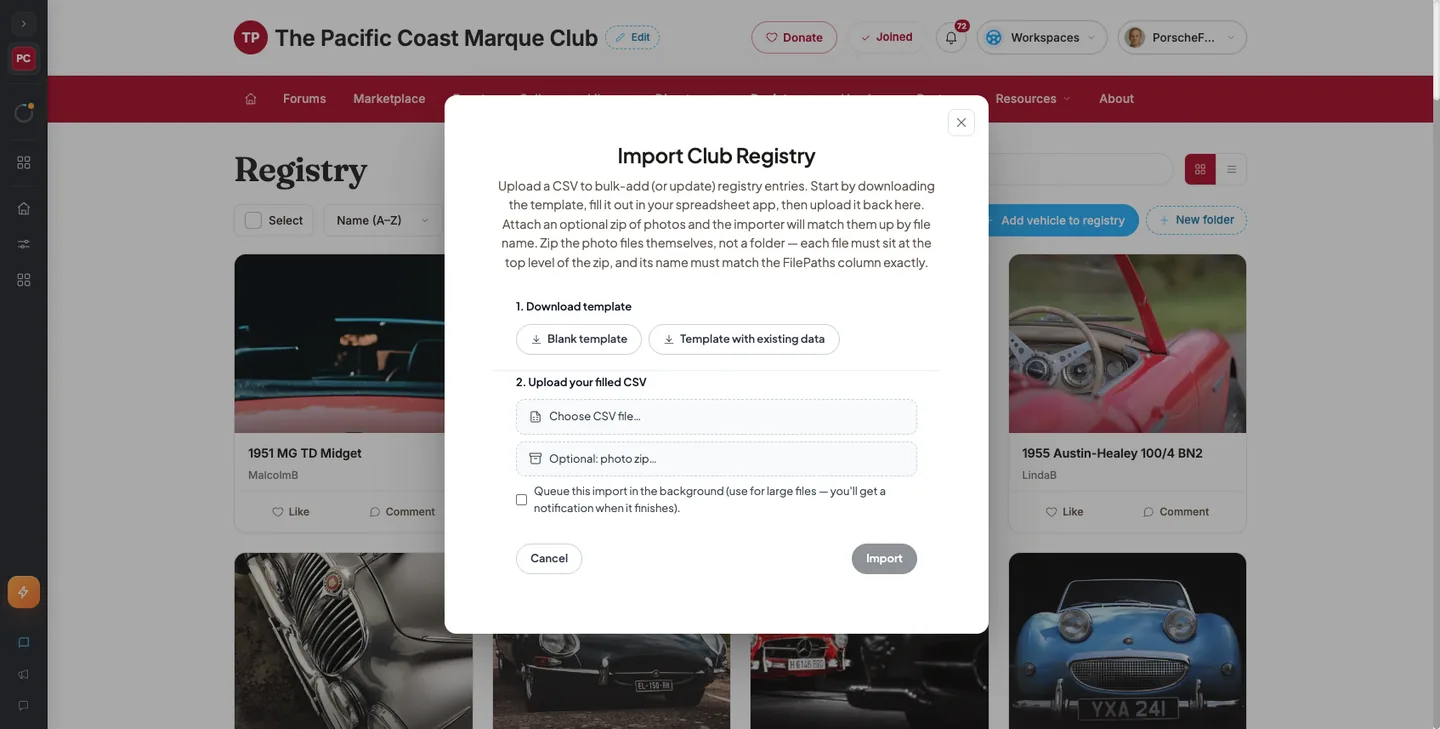
- Click Import Registry on that card. The dialog changes to Import Club Registry, with a short intro and two numbered sections: 1. Download template and 2. Upload your filled CSV.
Download the template
- Under 1. Download template, pick the version you want. The button reads Downloading… while the file is being built.
- Blank template gives you the header row only. Your browser saves it as
registry-template-<clubID>.csv. - Template with existing data gives you the same header row with every existing registry entry pre-filled, so you can edit entries in bulk and re-import. Your browser saves it as
registry-export-<clubID>.csv.
- Blank template gives you the header row only. Your browser saves it as
- Open the downloaded file in your spreadsheet app and confirm the header row. For a club whose Registry Template fields are Engine, Colour, Interior / Trim, and so on, it looks like
Owner,Name,Description,Engine,Colour,Interior / Trim,Transmission,Chassis / VIN,Engine number,Condition,Restoration status,Concours class,Year acquired,Indicated mileage,Notable history,Available for club display,FilePaths. Your club's list will differ afterDescriptionand beforeFilePaths.
Fill in the spreadsheet
- Add one row per vehicle. Do not rename, reorder, or delete header cells. Extra columns the importer does not recognize are ignored and reported, not imported.
- Enter a value in
Namefor every row. It is the only required column; a row without it fails with "name required" and nothing from that row is created. - Fill in
Descriptionand your Registry Template columns as you like.Owneraccepts any text and is not checked against your member list; whatever you type is stored and displayed as-is under the vehicle name on its Registry card, whether or not it matches a real member. - For photos, type the exact file name of each image into
FilePaths(for examplecar1.jpg). To attach several photos to one vehicle, separate the names with a comma, semicolon, or pipe (car1.jpg;car1-interior.jpg). The first photo listed becomes the cover photo. Names are case-sensitive and must not include a folder path. - Save or export the sheet as CSV (UTF-8). Keep the file name simple.
- If you listed photos, select the image files themselves in your file manager and compress them into a ZIP. Every image must sit at the root of the archive, not inside a folder, and be named exactly as it appears in
FilePaths.
Upload and import
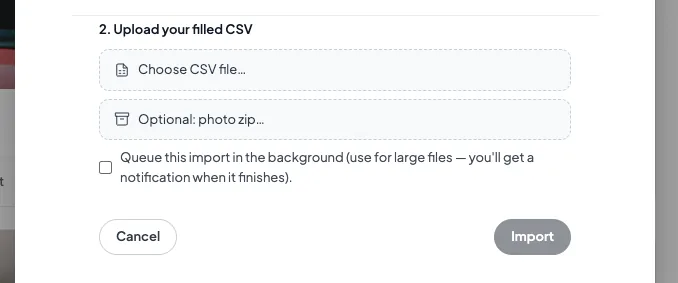
- Back in the Import Club Registry dialog, under 2. Upload your filled CSV, click Choose CSV file… and select your CSV. The chosen file name appears next to the picker and the Import button becomes clickable.
- If you have photos, click Optional: photo zip… and select your ZIP.
- For a large file, tick the Queue this import in the background checkbox so you can close the dialog and get a notification when it finishes. Small files do not need it.
- Click Import. If a ZIP is attached the button reads Checking zip… while your browser confirms every
FilePathsentry exists in the archive, then Uploading… while the files are sent. Close, Esc, backdrop click, and Cancel are disabled until the upload finishes.- If the zip check finds a problem, a red alert appears under the pickers listing each mismatched photo, and the upload is blocked. Fix the ZIP or the
FilePathscolumn, choose the files again, and click Import. - If the server rejects the upload outright, a toast titled "Import failed" appears and the form stays as it was so you can retry.
- If the zip check finds a problem, a red alert appears under the pickers listing each mismatched photo, and the upload is blocked. Fix the ZIP or the
Review the results
- After the upload is accepted, the dialog body switches in place to a section headed Import results. While the server processes the file you see a progress bar labeled Import progress, a status such as Queued, Processing, or Importing…, and a percentage. Small files reach 100% within a few seconds.
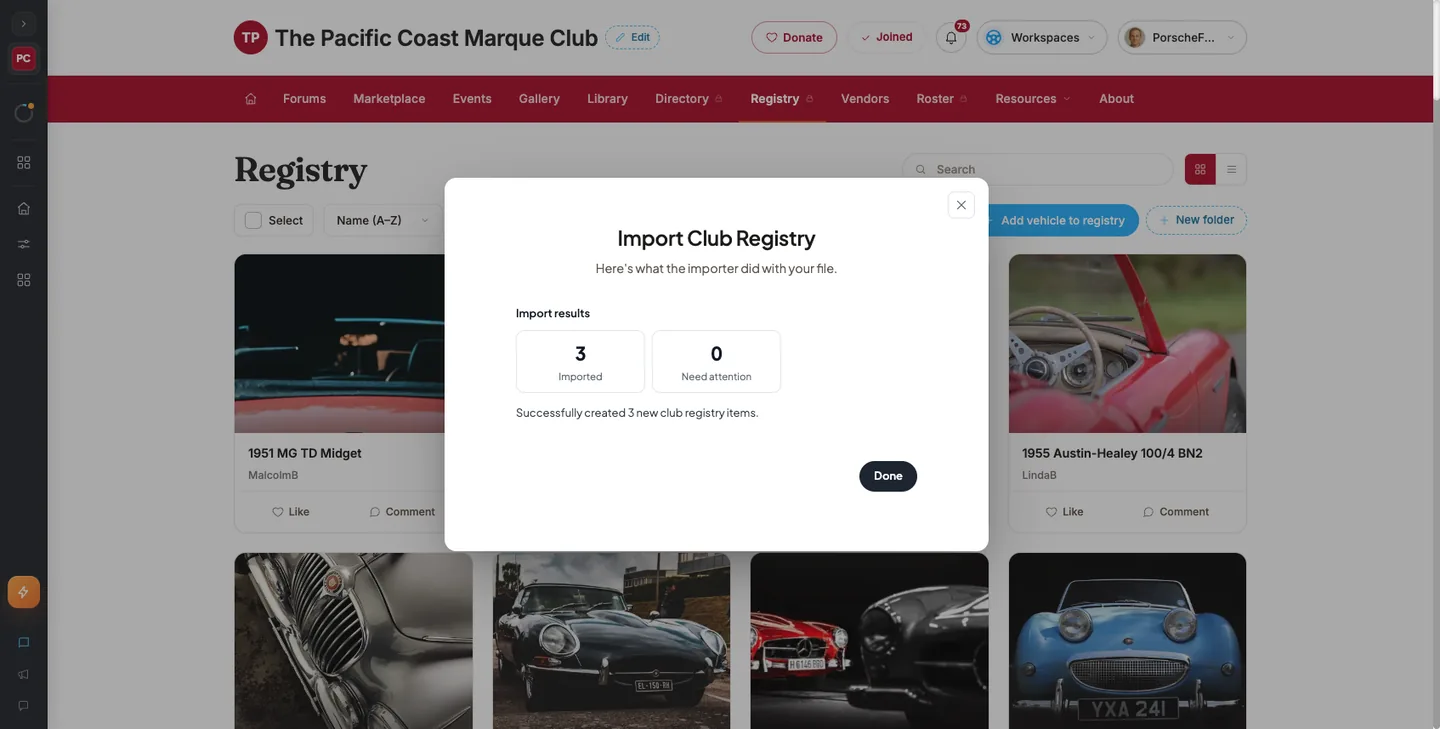
- When it finishes, read the summary lines (for example "Successfully created 3 new club registry items.") and the stats tiles Imported, Need attention, and Rows in report.
- If any rows had problems, scroll the Rows that need attention list. Each entry shows the vehicle's
Name(or Row N when the name is missing) followed by the reason. The first 25 rows are shown; click Show all to expand the rest. - Click Download results (CSV) to save a row-by-row report you can fix and re-upload. This button appears only when there are per-row results to download; a clean import has none.
- Click Done to close the dialog. The Registry page already shows the new entries.
Field reference
Dialog controls:
| Field | Required | Format / limits | Notes |
|---|---|---|---|
| Choose CSV file… | Yes | .csv file. The picker filters to .csv/text/csv, but the filter can be bypassed; the server rejects anything that is not CSV with "Only CSV format is supported" | Import stays disabled until a file is chosen. No client-side size, row-count, or header check. A ZIP holding a 7.9 MB JPEG imported without complaint |
| Optional: photo zip… | No | .zip archive with every image at the root, file names matching FilePaths exactly (case-sensitive) | Checked in your browser before upload; server does the real matching. Files in the ZIP not referenced by any row are ignored. Duplicate file names inside one ZIP are not detected |
| Queue this import in the background (use for large files — you'll get a notification when it finishes). | No | Checkbox, unchecked by default | Sends the import as a background job and promises a completion notification. In practice every import is processed server-side and polled the same way, so the results panel behaves identically either way |
Template columns (Owner, Name, Description, and FilePaths are fixed; everything between Description and FilePaths comes from your Registry Template):
| Field | Required | Format / limits | Notes |
|---|---|---|---|
| Owner | No | Text. Blank is accepted | First column. Accepts any text with no validation against the member list; a bogus value imports exactly like a matching one, and the raw text is displayed on the Registry card |
| Name | Yes | Text | The only required column. Blank or missing → per-row failure "name required". Also used as the row label in the results list |
| Description | No | Text | Free text shown on the registry entry |
| One column per Registry Template field | No (server enforcement of field rules is unconfirmed) | Header is the field name verbatim, including spaces and slashes (Interior / Trim, Chassis / VIN), in template sort order | Field types: Text, Paragraph text, Single choice, Multiple choice, Dropdown. Whether choice-type values must match the configured options is not confirmed; use the exact option text to be safe |
| FilePaths | No | One or more image file names separated by ,, ;, or `\ | `. Case-sensitive, no folder prefix |
Not present in the template: Year, Make, Model, Import Key, Photos, ClubAccountID. Any of those in your file are reported as ignored columns.
What happens next
The moment the server accepts the upload, the Registry list and folder counts on the club site refresh, and the dialog swaps to the Import results panel. Behind the scenes the server processes the file as a job and the dialog checks its status every 4 seconds for up to 20 minutes, updating the progress bar. You do not have to stay on the screen; the note under the bar reads "Your file is being processed. The results appear here the moment it finishes — you don't have to wait on this screen." Closing the dialog does not cancel the job.
When the job completes, the panel shows the server's summary lines. A clean run reads, for example, "Successfully created 3 new club registry items." with no download button. A mixed run shows both a success line and "There were N issues with your upload.", the Need attention tile turns amber, and the Rows that need attention (N) list plus Download results (CSV) appear. Processing is row-by-row: good rows are created even when others fail, and a single row can be created and still report an issue (for instance the entry exists but one of its photos was not found).
Imported vehicles appear immediately and publicly on the Registry page with no approval step, with photos attached where FilePaths listed them. You, the importing admin, get one in-app notification when the job finishes (see Notifications Center); its body is the import log, and clicking it reopens the club site with the Import Club Registry dialog showing that job's results. No email is sent. Vehicle owners named in the Owner column are not notified as far as the app shows.
Fixing problems
Messages shown in your browser before or during upload:
"N photos in your CSV can’t be found in the zip. Fix the zip (or the FilePaths column) and choose it again." — the pre-check found at least one FilePaths entry with no matching file at the root of the ZIP (singular "photo" when N is 1). The upload is blocked. Read the list beneath it, fix the ZIP or the spreadsheet, choose both files again, and click Import.
"Name: “ref” doesn’t match the capitalisation of “zipName” in the zip. Names must match exactly." — the file exists in the ZIP but with different letter case (Car1.JPG versus car1.jpg). Rename the file or the FilePaths cell so they match character for character.
"Name: “ref” is inside a folder in the zip (path). Zip the photo files themselves, not the folder." — you compressed a folder, so the images sit under a directory prefix. Open the folder, select the image files, and compress those instead.
"Name: “ref” is not in the zip." — no file of that name exists anywhere in the archive. Check for typos, a missing extension, or a photo you forgot to include.
"Couldn’t download template" with "Try again in a moment." — the template request failed for any reason (network, server, or club not found). Wait a moment and click the template button again. A download never fails silently; if nothing arrives, you will see this toast.
"Import failed" followed by the server's message, or by "The CSV couldn’t be processed. Check the template format and try again." when the server gave no detail — the upload itself was refused. Confirm the file is a CSV saved from the downloaded template and try again. When the server body has no message, the toast may instead read "We couldn't reach the server. Check your connection and try again." (no connection), "Something went wrong on our end. Please try again." (server error), "That request couldn't be completed." (request rejected), or "Server returned an error." Fix the connection or wait, then retry; the form keeps your selections.
Messages shown in the results panel:
"Import failed" as the section heading, with "reason Nothing was imported — fix the file and upload it again." — the server could not process the file as a whole. The reason is the text after the log's exception line; when there is none it reads "The importer couldn't process this file." Correct the file and upload it again.
"Only CSV format is supported" with log lines "EXCEPTION ENCOUNTERED: Only CSV format is supported" and "Import errored out after 0 seconds" — you chose a non-CSV file (for example .xlsx or .numbers) in the CSV slot. Export from your spreadsheet app as CSV and upload that.
"No records found to process." — the file has a header row but no data rows. Add at least one vehicle row and re-upload.
"There were N issues with your upload." — N rows had at least one problem. Scroll the Rows that need attention list, fix each row in your spreadsheet, and re-upload only the corrected rows.
"Additionally, there were some issues with the columns in your file:" followed by "Ignored Unexpected column 'Header'." — your file has a header the template does not contain (a renamed column, a stray column, or a field deleted from the Registry Template after you downloaded). The column is skipped, not fatal. Re-download the template and paste your data under the correct headers.
"name required" (per row) — the Name cell is empty, or the file has no Name column at all. The importer does not reject a file for a missing Name header; it accepts it, reports the odd headers as ignored, and fails every row this way. Add the column, fill it in, and re-upload.
"Error importing file 'x.jpg': The specified resource does not exist." (per row) — the entry was created but one of its photos could not be found on the server. Confirm the image is at the root of the ZIP with the exact name, then re-upload only the affected rows or add the photo directly on the entry.
"FilePaths specified but no zip file was uploaded" (per row) — the row's FilePaths cell names one or more photos, but no ZIP was attached to this upload. The row itself still imports (or updates); it is flagged in Rows that need attention so you notice the missing photos. Attach the photo ZIP and re-upload the affected rows if you want the images added.
"This import is taking longer than usual. It's still running — you'll get a notification when it finishes." — the dialog polled for 20 minutes without the job completing. The import is still running on the server. Close the dialog and wait for the notification, which reopens the results.
"We couldn't track this import here. It's still running — you'll get a notification when it finishes." — the dialog never found the job's record within 20 minutes. Same fix: wait for the notification.
"We lost track of this import. It's still running — you'll get a notification when it finishes." — the status check hit an error mid-way. The job is unaffected; wait for the notification.
Other things that can go wrong:
- Import stays disabled. You have not chosen a CSV yet, or a previous click is still in Checking zip… or Uploading…. Choose a file, or wait for the current request to finish.
- Nothing happens after clicking a template button. Check for the "Couldn’t download template" toast and your browser's download blocker. The file lands in your default downloads folder under
registry-template-<clubID>.csvorregistry-export-<clubID>.csv. - Some rows imported, some did not. This is normal; the importer is row-by-row. Download the results, fix the flagged rows, and re-upload. Re-uploading a row whose
Namealready exists updates that entry in place rather than creating a duplicate, so it is safe to re-upload the whole file. - A stray file in the ZIP. Extra files that no row references (a
notes.txt, a.DS_Store) are ignored by both the browser check and the server. They do no harm but bloat the upload; leave them out. - The zip check passed but the server still flagged photos. The browser check is a courtesy pass; the server is the authority. Read the per-row fragments, fix, and retry.
- You followed a notification link and only see the club page. The results panel opens only for owners and admins. Ask a club admin to open it.
Tips & tricks
- Start with a three-row test file. Confirm the columns, photos, and cover image land the way you expect before you run the full list.
- Use Template with existing data for bulk edits: export, change the cells in your spreadsheet, and upload it back rather than editing 200 entries by hand.
- Zip the photos from inside the folder (select the files, then compress) so nothing ends up nested. On a Mac, the
__MACOSXresource folder the Finder adds is handled for you. - Keep photo file names lower-case with no spaces, and paste them into
FilePathsfrom the file list rather than retyping them. The match is exact. - Headers with slashes and spaces (
Interior / Trim,Chassis / VIN) are correct as generated. Do not "tidy" them or the column will be ignored. - If your spreadsheet app offers "CSV UTF-8", choose it so accented characters in names and descriptions survive the trip.
Frequently asked
Do I have to wait on the results screen? No. Once the upload is accepted you can click Done or close the dialog; the job keeps running on the server and you get an in-app notification when it finishes. Clicking that notification reopens the results panel for that job.
What does the queue checkbox change? It marks the import as a background job and promises a notification when it completes. Every import is processed server-side and shown in the same results panel either way, so you lose nothing by leaving it unchecked for small files; tick it for large ones so you feel free to move on.
Can I import without any photos? Yes. Leave FilePaths blank and skip the Optional: photo zip… picker. Entries are created without images, and you or the owner can add photos later. See Add a vehicle to your garage for the "Select from My Garage" path, which links a member's own car with its existing photos.
Which columns are required? Only Name. Everything else, including Owner, may be left blank. Rows missing a Name fail individually with "name required" while the rest of the file imports normally.
Can I use the same file to update entries later? The Template with existing data export exists for exactly that: download, edit, re-upload. The server matches rows to existing entries by Name, so re-uploading updates the matching entries instead of duplicating them.
Do imported vehicles need approval? No. They appear on the public Registry page immediately after the import completes, in the same state as entries added one at a time.